
Add a very elegant looking Islamic Clock on your blog, thanks to http://www.al-habib.info/islamic-clock/ for this free clock, you can customise the colors etc. and use the code and instructions on this page to add this code to blogger blogs. Or simply use the button below to add the clock shown below.
Preview :
Preview :
Human Clock : A very interesting flash based clock, also known as hone hone clock, the code can be found on a japanase blog and http://www.codeweblog.com/a-very-interesting-flash-human-clock/

Add this Clock to your Blogger blog with the widget below:
There is a new option that lets blogspot bloggers to turn off the navbar which was displayed on top of their blogs, It is better to turn off the navbar this way than to use a hack to disable it. There many customized templates which use a hack in the style sheet to disable the navbar in blogger, Now there is an option to turn off the navbar in blogger. Follow the steps to turn off the navbar in the correct and legitimate way.
After logging into your dashboard, open up menu to select "Layout" (or"Template" for classic templates)


After logging into your dashboard, open up menu to select "Layout" (or"Template" for classic templates)

Most bloggers using the XML Layouts, have to click "EDIT navbar" in the top right corner of the window.

In the window that opens up, select the "off" option below and click "save"

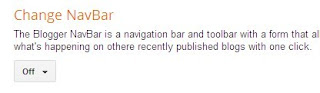
"Classic Templates" users need to go to "Templates" link and scroll down just a bit and in the option to "Change Navbar"->Select "off" option to remove the navbar


160by2.com is a reputed site that we have used in past to send free SMS's to any mobile in India. No ad's are inserted into the messages, It's fast and free. Registration is required, but it is fast and hassle free, once you get the activation SMS on your registered mobile, you can login and click on the "Send SMS" link

This opens a form where you can enter the mobile number to which you want to send your message and the message itself can be typed into the appropriate field.

Click on Send Now/Later and your message will be delivered to the recipient.
The point here is that ALL the PayPal Donation related tutorials are outdated and therefore this tutorial is the only tutorial at the time of writing this post, which guides you through the process of having a way to accept donations on your Blog or a Website.
First, you need to have a Premier or Business account. If you have a personal account, you can easily upgrade to one of these, after logging into your PayPal account page.
Here's how you create and customize your free PayPal Donate widget, to accept donations from your visitors. Go To https://giving.paypallabs.com/authenticate/review and click on "create new widget" button (you need to login first to enable that button)
Customize Themes & Colors : Click on any theme or color to select one, The live preview of the widget is on the right.

#2
Add a title & Name your cause

#3
Add the URL of the cover image that you want on your widget, this could be a logo or a relevant photo or illustration. You can also set Goals & Progress Optionally

#4
Select the contribution amount that you want to recieve, minimum is $5

#5
You can enter upto 1000 characters to describe why you are raising funds, also you can add the URL of your webpage

#6
Post your widget Online - Select whether you want to post to a blogger blog or Get the HTML code and add to another blog or website.

#7
If you want to add this as a blogger widget then select the blogger option and continue to add the widget on you blog as a page element on your selected blog

There you have it, with just a few clicks and effort, you can have a PayPal Donate widget on your blog that you can use to raise funds from your blog